How to Organize Your Garage in Four Easy Steps
You’ve been putting it off for months, years even, but you’ve vowed to finally get it done and this time you’re sticking to it. Good for you! I wish I could be there to witness the remarkable change that is about to occur.
Hopefully, you’ve read my previous blog, Preparing for Outdoor Organization, and are fully equipped to tackle the upcoming project. If you haven’t, I highly recommend that you do. It’s imperative that before you set out to begin the process of reorganization, you have everything you’ll need to complete the task. Otherwise, you’ll be forced to make a Home Depot run in the middle of the project which might result in an excuse to procrastinate and if you’re here, that means you’ve procrastinated long enough, so make sure you’re ready before moving forward.
Let’s say that you are. Ready that is. Pushbroom in hand, mask over face, you’re standing at the threshold of the garage looking over your possessions thinking to yourself, “How did I let it get this bad? Where do I start? How long is this going to take?” Don’t fret. I’ve been in your shoes before. The process won’t be easy, but like all things in life, it won’t last forever either. The best thing to do is to start.
YOU CAN DO IT!!!
- STEP ONE: PURGE
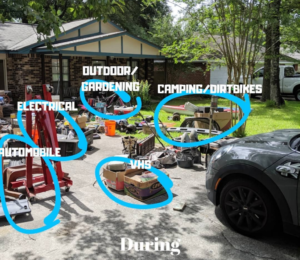
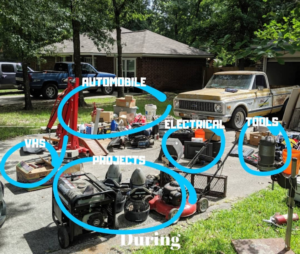
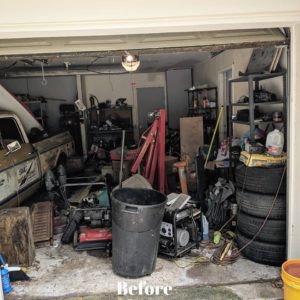
Move the cars out of the driveway and onto the curb. Drag the basketball hoop into the grass. Give yourself a lot of open space. Then, one by one, little by little, pull everything out of the garage and set each item into piles, each pile containing only articles with a similar purpose.
- Automotive (liquids, parts, ect…)
- Toys/Outdoor Play
- Gardening
- Tools
- Ongoing Projects
- Camping
- Cleaning Supplies
- Paint/House
- Chairs
- Trash
- Donate
- Electrical
- Keepsakes
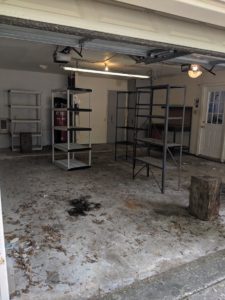
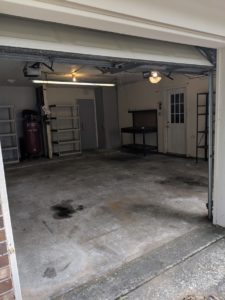
- STEP TWO: SCRUB
It might seem redundant to clean what is outside and will most certainly become dirty once again, but a clean workspace is essential for planning. Once everything has been pulled out, and I mean everything, sweep the floor, wipe down the shelves, clean the windows, etc.
- STEP THREE: PLAN
Now that your garage is empty and sparkling, step back and take a long hard look at your space. Here are some questions I suggest that you ask yourself:
- How do you intend to use this space?
- What are three things that you want to do in this area regularly?
- What is preventing you from having the garage of your dreams?
- What do you need to make it a reality?
Get a notebook and draw out how you want your garage to look. Remember, things used most frequently should go in the front and what you intend to store for the holidays or for occasional recreational use should go towards the back. Do your best to utilize vertical space, especially if your goal is to use the garage for parking or hosting.
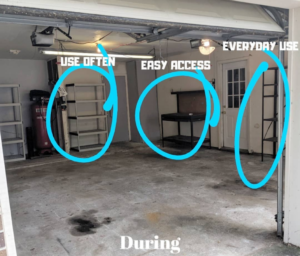
Note the shelving labeled “use often” despite being in the back. That is because in this particular home the shelf is located near the only point of entry to the backyard. As it is a high point of traffic, items there should be considered a priority. However, in most homes, this isn’t the case. It’s important to take into account where doors are located, where the attic access is, and if the hot water heater is in the garage or not, ect… when planning your space.
Now turn around and look at the piles in the driveway. Those things are preventing you from having the garage you’ve always wanted. So, ask yourself, how much of it do you really need to keep? Go through everything. As you assess each object, imagine a home for it. Where do you see it? On a shelf, hanging on a hook, in a tote or toolbox? Where do you plan to put it? How often do you plan to use it? How expensive is it? Can you get another one like it for less than $20? If you cannot think of a home for it, if it is no longer necessary, if you can get another for relatively cheap, if you haven’t used it in the last six months and can’t see yourself using it again in the foreseeable future, then seriously consider tossing it out. Seriously. Toss it out.
While you’re doing this, make a list of what you need as you go through each pile.
(This is by far the longest part of the process, so don’t be surprised if you run out of time. If that happens, just bring everything you intend to keep back into the garage temporarily and return to it the following day. )
- STEP FOUR: SET
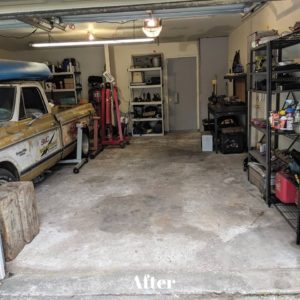
You’ve cleared out the garage and cleaned it. You’ve planned your space and thrown out what is no longer needed. It’s time to put everything home.
Start by purchasing the products you’ll require to make your space organized:
- Shelving
- Totes
- Bins
- Trunks
- Dividers
- Toolbox
- Wall Mounts
A quick Pinterest search can show you many DIY options for anyone on a strict budget.
With your plan in mind, or in hand if you drew out your ideas in a notebook, get everything set up exactly how you want it, and then put each item in it’s “home.”
It’s that simple.
Four easy steps:
- Purge
- Scrub
- Plan
- Set
Good luck, my friend, and Godspeed.
If you liked this post, check back soon for my next one, “Save a Second, Spend an Hour.”